 Snapshot
About credit card vaulting
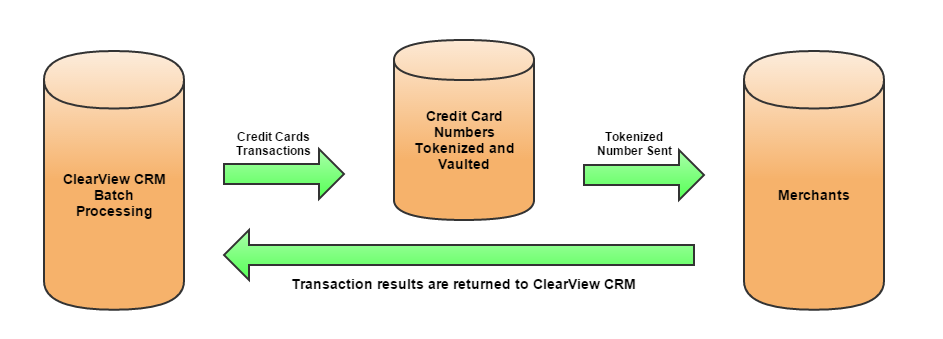
ClearView CRM's credit card vaulting solution provides added security to organizations processing credit card transactions.
Credit card vaulting is a method used to store credit card numbers in a secured area apart from the actual application. By securing sensitive information in this specific area, it reduces the chance of compromising a member/prospects information.
The credit card number, once stored in the vault, is assigned a randomly generated number called a Token. The Token replaces the credit card number throughout the application. The credit card numbers are not stored anywhere in ClearView CRM. The Token has no value besides serving as a way to link to your real information stored in the vault. Your credit card information remains secure within the vault.
Credit card vaulting is PCI compliant which lessens the burden for you to meet those requirements.
To learn more about PCI Compliance and what it means for you, see our Credit Card Vaulting newsletter.
|
(Click the image to enlarge)
(Click the video to play; Adjust volume and scale from the player) |
 Legacy Steps
How to use credit card vaulting in PledgeMaker
How to create a token for a new single transaction
To create multiple tokens for multiple transactions through batch processing
To create a token for a new single transaction:
|
1. Log on to the PledgeMaker application. 2. From the PledgeMaker Home menu, click Prospect
3. Enter search criteria in the appropriate fields and click Search. 4. Once you have found your prospect, select Gift from the side PledgeMaker menu.
5. On the Gift History screen, click New to create a transaction record.
6. Enter all the necessary transaction criteria and click OK.
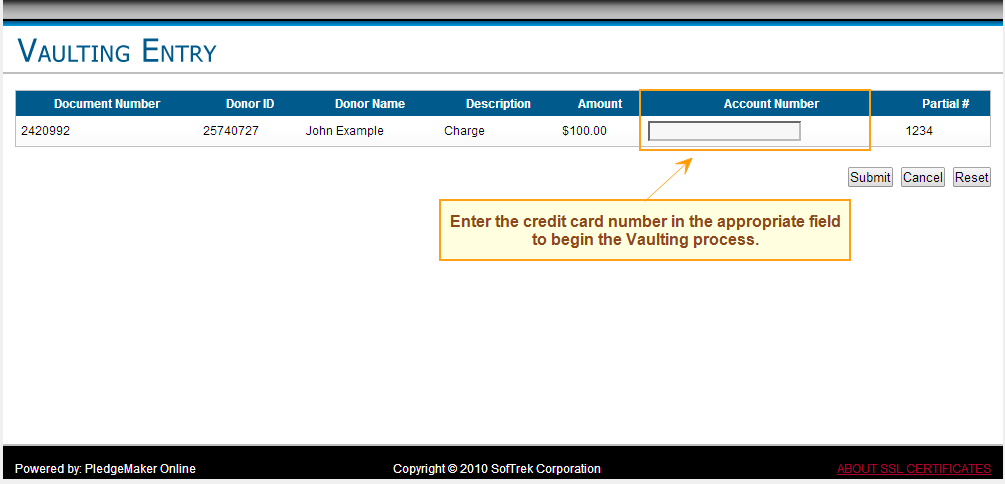
7. Enter a payment code related to the card type 8. Enter the amount of the transaction in the Total Amount field. 9. Enter only the last four digits of the credit card number in the Credit Card # field. 10. Enter the credit card's date of expiration in the Expiration field. 11. An Entry button and a Token button appear next to the Credit Card # field. 12. Click the Entry button to access the Valuting Entry screen. 13. Enter the credit card number in the available field
14. Click the Finish button to process the card number for tokenization, or Cancel to stop the process.
15. On the Payment Method screen, click the Token button and the field populates with the appropriate number. 16. Click OK to save the transaction. |
(Click image to enlarge) |
To create multiple tokens for multiple transactions through batch processing:
|
1. Log on to the PledgeMaker application. 2. From the PledgeMaker Home menu
3. Click New Batch to create a Batch header.
4. On the Batch Add screen, enter in your totals and click the OK button.
5. Enter a unique number for your Batch. 6. Click OK to save. 7. Return to the Batch header by:
8. Once on your newly created Batch header, click the Details button to enter your transactions. 9. Click the following buttons
10. When you enter your credit card transactions, the screens change accordingly to allow you to enter a credit card number. Only enter the last four digits of the number in the credit card field and then click OK. 11. Once all the transactions are entered, click close and return to the Batch View screen.
12. Click the Entry button to access the Vaulting Entry screen. 13. Enter the credit card numbers in the appropriate fields on this screen. 14. Once entered, click the Submit button to accept the entries, Cancel to stop the vaulting process or Reset to clear all fields. 15. Once you Submit your entries, a Token is generated and assigned to each Partial #. 16. Click the Finish button to save the process, or Cancel to stop the process.
17. On the Batch View screen, click Token.
18. Click OK to save the Batch transaction.
|
(Click image to enlarge) |
| Back to top | |

 FAQ's
FAQ's
Credit card vaulting frequently asked questions
|
How does this work in ClearView CRM? |
|
|
Currently, ClearView CRM only processes credit card transactions in batch. When a card is entered during batch detail entry and processed, the number will go through our vaulting process. This adheres to PCI compliance standards. |
|
|
How does Credit Card Vaulting affect the Credit Card Status Report? |
|
|
Vaulting will not change the Credit Card Status report. You will be able to access and run the report as you always have. |
|
|
When does charging occur? When does settlement occur? |
|
|
Because the processing of credit cards will be changing, charging and settlements will occur at the same time as they do now. |
|
|
Have additional questions? |
|
|
Contact Client Solutions for help. |
PledgeMaker, Token, Batch, Go to glossary ... |
|
![]() Privileges to access features or to personalize configurable ones can vary by user, as well as by role, and are determined by your organization. If you have questions about your privilege settings, contact your administrator.
Privileges to access features or to personalize configurable ones can vary by user, as well as by role, and are determined by your organization. If you have questions about your privilege settings, contact your administrator.