Panels

camera 60 Snapshot

About panels

Dashboards are organized into Panels. Panels are like mini-reports, displaying at-a-glance information on a particular topic of interest, oftentimes related to a certain type of record. Data-driven panels are intended to offer a quick glimpse of the numbers, with some providing access to more detailed records. Task-oriented panels display synopsis information that act as portals to full records.


Multiple dashboards can be created, which allows you to toggle back and forth between different arrangements of panels. For example you could have one dashboard dedicated to graph-style giving panels, and one dashboard dedicated to to-do style action panels. 


info 16You can Manage Dashboards through Application Settings.
 
warning_16Data for some panels is generated from the data warehouse. Data is up to date as of the panel’s time stamp. If no prospect records themselves have been updated in the data warehouse for which the panel relies on, an error message will display indicating as such. Panels can be organized and configured in a way that best supports your own responsibilities. The options are limitless, giving you the power to customize your workspace to meet your own optimal productivity needs.
 
info 16You can create custom panels to directly suit the needs of your organization. However, Custom Panel Configuration is an Advanced Feature reserved for ClearView Administrators. For assistance with configuring new custom panels, please contact Client Solutions.

1 panels

(Click image to enlarge)


Back to top

steps 60 Steps

How to use panels

To add a panel to a dashboard

To remove a panel from a dashboard

To refresh a panel within a dashboard

To move a panel around a dashboard

To edit a panel within a dashboard

To configure panel settings within a dashboard

To add a panel to a dashboard:

1. While on the dashboard that you want to add the Panel to, click the Add Panel button toward the top-right of the dashboard.expand img

  • The Add Panel library displays.
warning 16 A dashboard with no existing Panels will display a message indicating that you have not yet set up any Panels along with an Add Panel button that you may use to begin.expand img

2. Examine Panel choices within the Add Panel library window:expand img

  • to scan through the entire list of options, use the scroll bar.
  • to narrow options, click within the sidebar to use the Categories links. expand img
  • to search options, type search terms into the Panel Search field. expand img

4. Click Go to display results.

5. Choose a Panel and click its associated Add Now button to display it on the dashboard or click the Cancel link to return to the dashboard page without making any changes.expand img

warning 16 Some Panels require settings configuration before the Panel can be added to your dashboard.
expand img

11 panels

(Click image to enlarge)


Back to top

To remove a panel from a dashboard:

1. At the top of the Panel that you want to remove, click the drop-down menu indicator. The drop-down menu displays. expand img

2. From the drop-down menu, choose Delete to delete the Panel.expand img

  • The Panel is immediately removed from your dashboard.
warning 16 If this is a shared dashboard, the Panel is removed for all users who access the shared dashboard, as well.

12 panels

(Click image to enlarge)


Back to top

To refresh a panel within a dashboard:

1. Within the Panel you want to refresh, in the top-right corner, click the drop-down menu indicator.expand img

  • The drop-down menu displays.

2. Choose the Refresh option from the drop-down menu.expand img

  • The Panel will refresh and then display the most up to date information available.
warning_16 Information drawn from a data warehouse is as up to date as indicated by the time stamp.

14 panels

(Click image to enlarge)


Back to top

To move a panel around a dashboard:

1. At the top of the Panel that you want to edit, click-and-hold on the Move icon or anywhere on the Panel’s header row.expand img

2. Drag the Panel to its desired location.

info 16 A dotted outline indicates where the Panel will be placed as you drag the Panel along the dashboard.
 

3. Release and the Panel will automatically align itself into its new position.

16 panels

(Click image to enlarge)


Back to top

To edit a panel within a dashboard:

1. At the top of the Panel that you want to edit, click on the settings icon. Panel settings are displayed. expand img

2. Edit the settings of the Panel as desired.

3. Click the Save button to save your changes or the Cancel link to return to the dashboard page without making any changes.


info 16 Use Manage Dashboards in Application Settings to organize the way you view Panels in multiple ways for different purposes; save multiple dashboard, build them as desired, and toggle back and forth as needed.

18 panels

(Click image to enlarge)


Back to top

To configure panel settings within a dashboard:

1. At the top of the Panel that you want to edit, click on the Settings icon . Panel settings are displayed.expand img

2. Configure Panel Settings as desired:

  • Adjust the Number of rows to show using the arrow buttons.expand img
  • Adjust the Filter by settings using the radio button to inidate whether All or Mine criteria should be displayed.expand img
  • Configure which columns are displayed in the Panel by clicking the Add icon for desired columns in the Available Columns field.expand img
  • Remove columns from being displayed in the Panel by clicking the Minus icon for columns no longer desired in the Displayed Columns field.expand img
  • To change the order in which columns are displayed, click-and-hold the arrow icon and drag-and-drop the column into its desired position.expand img
  • Select which column that Panel data is sorted by using the Sort By drop-down menu.expand img
  • Set the direction in which Panel data is sorted using the Sort Direction radio buttons to indicate whether Ascending or Descending order is preferred.expand img 
info 16Ascending order sorts data from lowest to oldest to newest, least to greatest, and A to Z. Descending order sorts data from newest to oldest, greatest to least, and Z to A. 
 

3. Click the Save button to save your configuration or the Cancel link to return to the dashboard without making any changes. 

info 16Not all Panels are configurable, and not all configurable Panels have all of the configuration options described. Configuration options are dependent upon the type of data that is displayed in each specific Panel.

26 panels

(Click image to enlarge)


Back to top

grad cap iconAdvanced Features

How to use dashboard administration advanced features

To configure a custom panel for data tables

To create a custom view for data table panels

To configure a custom panel for reports

To configure a custom panel for custom content definitions

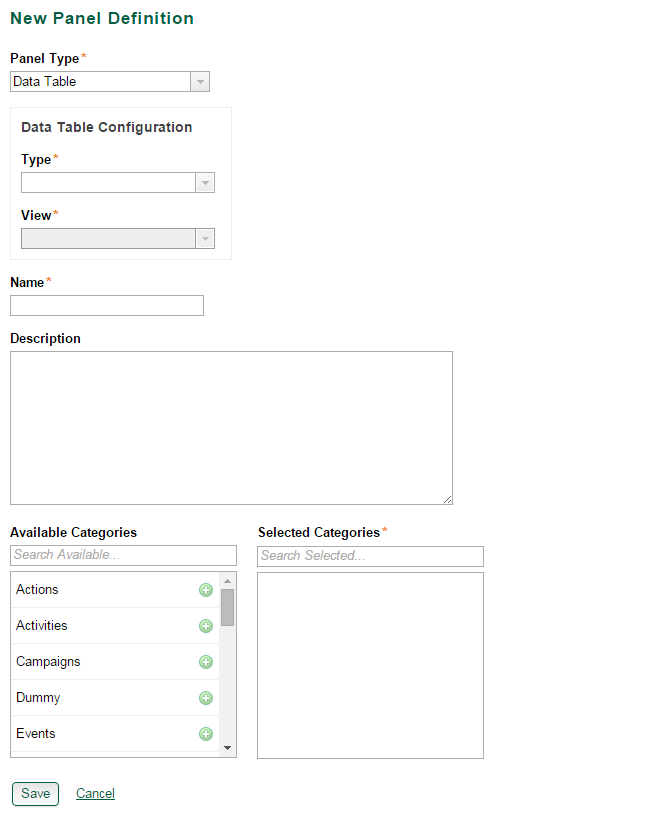
To configure a custom panel for data tables:

warning 16Prior to creating a Custom Panel for data tables, a custom view is required. Custom View creation is reccomended for advanced users with a basic working knowledge of XML coding. If you need help configuring a custom view, please contact Client Solutions.
 

1. From the drop-down user menu, click Administration.expand img

  • The Administration page is displayed.expand img

2. Click the Configure Panels button.expand img

  • The Panel Configuration screen will display.expand img

3. Click the Add New Panel Definition button.expand img

  • The New Panel Definition screen will display.  expand img

4. From the Panel Type drop down, select Data Table.expand img

  • New fields will display: Type and View.expand img

5. Select the data table configuration Type.

6. Select the View you would like displayed on the Panel.

7. Enter a name for your panel in the Name field.expand img

8. Enter a description for the panel in the Description field.expand img

9. Select the fields you would like Custom Panel View to be assigned to in the Available Categories list by clicking the green plus button.expand img

info 16 To unassign a category from the Custom Panel View, you can remove it from the Selected Categories list by click the red minus icon.expand img

10. Click Save to keep your settings, or Cancel to return to the previous screen.expand img

11. When saved, the new panel will be displayed on the Panel Configuration screen.expand img

info 16The New Panel Definition will be available for Dashboards once created. On your Dashboard, when you Add New Panel expand img, the created panel will appear in the Panel Library under the Categories assigned to it.expand img

054 panel config adv features

(Click image to enlarge)


Back to Top

To create a custom view for data table panels:

   
warning 16This is recommended for advanced users with a basic working knowledge of XML coding. If you are inexperienced with XML, configuring a custom panel based on a custom data table view using this method is not advised without support from Client Solutions.
 
1. From the drop-down user menu, click Administration
  • expand imgThe Administration page is displayed.expand img

2. Click Data Table Views.expand img

  • The Configure Data Table Views page is displayed.expand img

3. Select a data table you wish to create a new table view for by using the data table drop-down menu.expand img

info 16The table view will be created within the selected table.
 

4. Click the Custom Views tab.expand img

info 16If there are existing Custom Table Views associated with the selected table, they will be displayed on the tab
expand img. If there are no Custom Table Views, a warning will display indicating no filters exist.expand img

5. Click the Add View button.expand img

  • The Create Custom View page for selected data table will display.expand img

6. Enter a name for your table view in the Name field.expand img

7. Select where the table view will be accessible using the Location drop-down menu.expand img

  • Selecting All will make the table available in all locations.
  • Selecting Organization-Wide will make the table available to all users within an organization.
  • Selecting Prospect Records will make the table available for prospects records.
info 16The Locations displayed on the drop-down menu may differ between data tables. All, Organization-Wide, and Prospect Records are the most common locations available to data tables, however, additional locations may appear.
 

8. Using XML coding, you can begin setting the filters for your table view as desired.expand img

info 16A reference guide for XML tags can be found on the SofTrek Reference tab and the Query Filter Reference Guide.expand img

9. Click the Verify link to ensure your code is complete.expand img

info 16An error message will display if there are broken and/or open tags.expand img

10. Click Save to keep your settings or Cancel to return to the previous screen expand img

info 16Once saved, the new table view will be displayed on the Custom View tab within the data table associated with it.

008 panel config adv features custom table view overview

(Click image to enlarge)


Back to Top

To configure a custom panel for reports:

1. From the drop-down user menu, click Administration.expand img

  • The Administration page is displayed.expand img

2. Click the Configure Panels button.expand img

  • The Panel Configuration screen will display.expand img

3. Click the Add New Panel Definition button.expand img

  • The New Panel Definition screen will display.  expand img

4. From the Panel Type drop down, select Report.expand img

  • New fields will display: Report Path and Layout Strategy.expand img

5. Select the Report Path from the drop-down menu.

info 16The drop-down menu only shows reports present in the "/Panels" folder in the report repository which you have permissions to view. Alternatively, you can copy and paste the path of the report into the Report Path field in ClearView CRM. To find the Report Path In the report repository, right click the report and click properties. The path is displayed on the new window.
  • Select a Layout Strategy for your report, Centered, Fit to Width, Left or Right.

6. Enter a name for your panel in the Name field.expand img

7. Enter a description for the panel in the Description field.expand img

8. Select the fields you would like Custom Panel View to be assigned to in the Available Categories list by clicking the green plus button.expand img

info 16To unassign a category from the Custom Panel View, you can remove it from the Selected Categories list by click the red minus icon.expand img

9. Click Save to keep your settings, or Cancel to return to the previous screen.expand img

10. When saved, the new panel will be displayed on the Panel Configuration screen.expand img

info 16The New Panel Definition will be available for Dashboards once created. On your Dashboard, when you Add New Panel expand img, the created panel will appear in the Panel Library under the Categories assigned to it.expand img

055 panel config adv features

(Click image to enlarge)


Back to Top

To configure a custom panel for custom content definition:

1. From the drop-down user menu, click Administrationexpand img
  •  The Administration page is displayed.
expand img

2. Click the Configure Panels button.expand img

  • The Panel Configuration screen will display.expand img

3. Click the Add New Panel Definition button.expand img

  • The New Panel Definition screen will display.expand img

4. From the Panel Type drop down, select Custom Content expand img

  • A new field displays: Content Definition.expand img

5. Select the Content Definition to display on the panel.

6. Enter a name for your panel in the Name field.expand img

7. Enter a description for the panel in the Description field.expand img

8. Select the fields you would like Custom Panel View to be assigned to in the Available Categories list by clicking the green plus button.expand img

info 16To unassign a category from the Custom Panel View, you can remove it from the Selected Categories list by click the red minus icon.expand img

9. Click Save to keep your settings, or Cancel to return to the previous screen.expand img

10. When saved, the new panel will be displayed on the Panel Configuration screen.expand img

info 16The New Panel Definition will be available for Dashboards once created. On your Dashboard, when you Add New Panel expand img, the created panel will appear in the Panel Library under the Categories assigned to it.expand img

057 panel config adv features

(Click image to enlarge)


Back to Top

Glossary terms:

dashboard, data warehouse, prospect, panel, settings - application, 

Go to glossary ...

Related articles:

Administration: Dashboard Administration

Dashboard Management: About Dashboards

Settings: Manage Dashboards

Review other Dashboard Management articles

How helpful was this article?
{extravote 33}

Leave a suggestion help 16

privs 32 Personalization privileges of configurable features can vary by user or role, and are determined by your organization. If you have questions about your user permissions, contact your administrator.