 Snapshot
About batch header
The Batch header is your first step in Batch Processing. Before you begin creating Batch Detail records, you need to either create a Batch header or use a pre-existing Batch Template. A Batch header is a summation of the total value of every included transaction and any relative information about the Batch. The Batch header also serves as a method of auditing your work once all of your detail records are entered.
When all of your information is saved, and in balance, you can schedule a post using the Batch Scheduler. The Batch Scheduler allows you to select a date and time to post your Batches. Alternatively, if a Batch has failed to post, you can re-attempt the post over a specified time frame, decide when to begin and when to stop any future attempts. You can also have a success message sent to any identified parties when the Batch is posted.
The following table describes all of the available fields on the Batch header page: |
(select image to enlarge) |
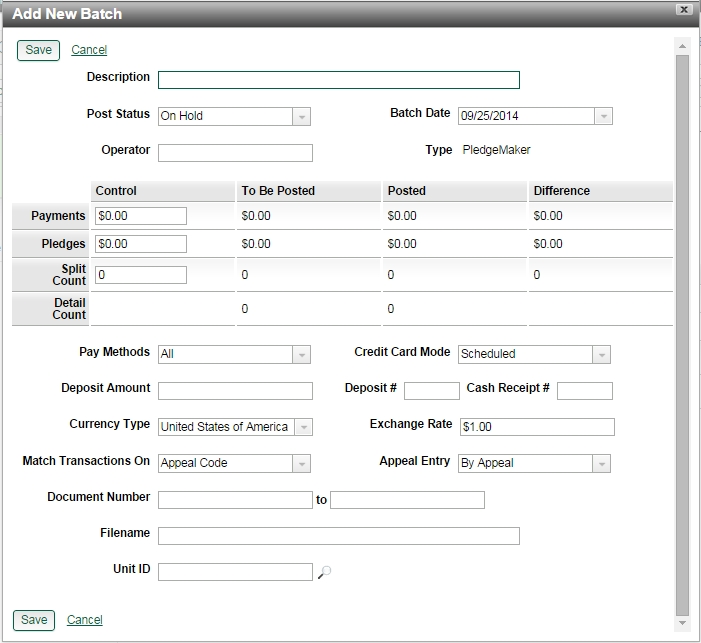
Batch Header Fields
| Description |
A free-text field used to name/identify the Batch.
|
| Post Status |
The status of the batch.
|
| Batch Date | The date the batch is completed. |
| Operator |
The person responsible for the batch. The person who creates the batch is recorded in Audit Information so the information does not have to be repeated. |
| Type |
Identifies the way the batch is created. The types are:
|
| Control Totals |
Control totals act as a basic automatic check for batch-entry accuracy. Control-Total Screen Values RowsPayments: Total payment in the batch. Pledges: Total pledge amounts included in the batch. Split Count: Total number of transactions included in the batch. Detail Count: Final count of details in each column. Control-Total Screen Values ColumnControl: Manually entered totaled values used to cross-check detailed transactional items. To Be Posted: The expected total value. Posted: The total value of posted items. Difference: The discrepancy between expected value (Control) and actual value not posted (To Be Posted). |
| Pay Methods |
Pay methods included in the batch.
|
| Credit Card Mode |
Identifies how credit cards are processed. Historical: Normal Value when the credit card feature is not installed. Credit cards entered in this batch are for archival purposes and will never be posted. Scheduled: Normal value when the credit card feature is installed. Credit cards entered in this batch will be sent for authorization on a scheduled basis. Interactive: Optional value when the credit card feature is installed. When credit cards are entered, data entry cannot continue until the credit card is authorized. All of your transactions are verified before completion. |
| Deposit Amount | Total amount deposited with your financial institution. |
| Deposit Number | The transaction number for the deposit. This number appears on the financial institution's deposit receipt. |
| Cash Receipt | The transaction number for cash-only deposits. This number appears on the financial institution's deposit receipt. |
| Currency Type | Identifies the type of currency used in this batch. |
| Exchange Rate | International currency exchange rate. At batch posting, the entered gift amounts will be multiplied by the Exchange Rate. This allows foreign currencies to be converted to domestic values. This allows ClearView to display all gifts in domestic currency. |
| Match Transactions On | This determines the rule to be followed during batch posting when no specific transaction is selected. For example, if a pledge payment is entered without selecting a specific pledge, batch posting will follow this rule to determine the pledge the payment is to be applied. "Fund" means the pledge must have the same fund as the payment. "Fund/Appeal" means that if a fund match is not found, posting will attempt to match on appeal. |
| Appeal Entry | This determines whether the entry screen for this batch will require direct entry of an Appeal code or will allow entry of a Package code instead. Entry By Appeal is the default. Entry by Package is suitable for high-volume direct mail response entry when a specific Appeal code cannot be determined. |
| Document Number | These fields are intended for situations in which document numbers are assigned externally, but the transactions are entered manually instead of being loaded through Lockbox. Entry of a document number-range on the Batch header will restrict entry to documents within that number range. |
| File Name | A free-text field intended for use with Lockbox. When Lockbox creates a batch, Lockbox loads this field with the name of the data file |
| Unit ID | Unit assigned to a Batch. There is no functionality attached to this field. |
 Steps
Steps
To filter and find current batches
To filter current batches by defined search criteria
To set default values on batch detail records within a specific batch
To post multiple batches and set a recurring posting schedule
To filter and find current batches
|
1. Toward the top-left of the Batch header screen, click the Recent Batches drop-down menu, and select one of the following options
|
(select image to enlarge) |

To filter current batches by defined search criteria
|
1. On the main Batch header screen's
2. When you are finished entering your criteria, select the Go button to apply the filters. |
(select image to enlarge) |
|
|
To create a batch header
|
From Scratch 1. Toward the top-right corner of the Batch header screen, select Create New Batch, and then select From Scratch 2. Fill in any available information in the associated fields, and enter the total value of your Batch in the Control fields
3. When finished, select Save to save your changes or Cancel to return to the previous page.
From a Template 1. Toward the top-right corner of the Batch header screen, select Create New Batch, and then select From Template
2. Select the Batch Template you wish to use from the coded table.
3. Fill in any additional information in the associated fields, and enter the total value of your batch in the Control fields |
(select image to enlarge) |

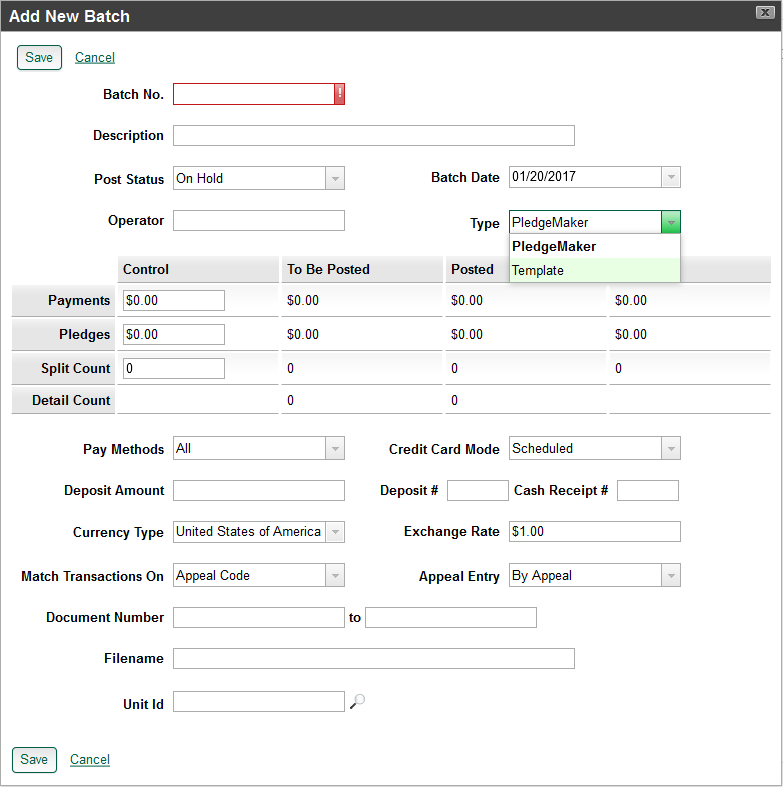
To create a batch template
|
1. In the top-right corner of the Batch header screen, click Create New Batch. 2. Select From Scratch
3. Change the Type field from PledgeMaker to Template. 4. Complete the rest of the fields on the screen, and click Save.
|
(select image to enlarge) |
To set default values on batch detail records within a specific batch
|
1. Toward the top-right corner of a Batch header screen, click the Tools drop-down menu, and choose Layout.
2. Navigate to the fields for which you want to set default values. 3. Select a value from the drop-down list, or type a value that you want to default in the fields. 4. Click the Save VAE Config button, located in either the top or bottom left corners, when finished. The values you saved will default on each batch detail record for the current batch. |
(select image to enlarge) |

To post a single batch
|
1. On the Batch header screen, verify the current batch by comparing the “Control” totals with the “To be Posted” totals, and make sure the “Difference” column shows zeros. If not, click Edit to make changes. 2. Click Edit, and at the Post Status field drop-down menu, select Ready to Post, then Save.
3. First, validate that the batch is in balance. Click the Post option drop-down arrow (not the icon or label), and select Validate.
4. On the Validate Batch No. pop-up screen, choose when to run the validation process.
5. Enter an email address in the Success Message Address field to receive an email message that the validation was successful. 6. Optionally, enter another email address in the Success Message CC field to send another person an email message stating that the validation was successful. 7. Click Submit Job to process the validation.
8. Once you have checked the validation email and are ready to proceed with posting, click Post (the icon or label, and not the drop-down menu).
9. On the Schedule Batch No. for Posting pop-up screen, choose when to run the posting process.
10. Enter an email address in the Success Message Address field to receive an email stating that the posting was successful. 11. Optionally, enter another email address in the Success Message CC field to send another person an email stating that the posting was successful. 12.Click Submit Job to process the posting at the scheduled time.
|
(select image toenlarge) |

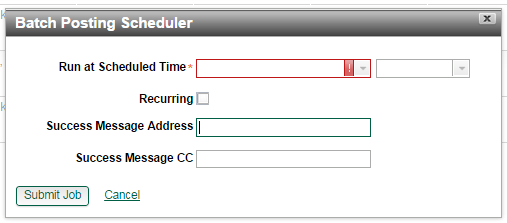
To post multiple batches and set a recurring posting schedule
|
1. On the Batch header screen, in the top-left corner, click the Recent Batches drop-down menu. 2. Filter the list of batches by either Ready to Post or Batches with Suspended Details, depending on which batch status type you want to schedule to post.
3. Click Schedule Posting. 4. Choose one of the following options:
6. Click Submit Job to submit the recurring posting schedule.
|
(select image to enlarge) |
To delete a batch header
|
1. Toward the top-right corner of the Batch header screen, select Tools, and then select Delete
2. Select continue to Delete the header and all associated details unless indicated otherwise. |
(select image to enlarge) |

![]() Privileges to access features or to personalize configurable ones can vary by user, as well as by role, and are determined by your organization. If you have questions about your privilege settings, contact your administrator.
Privileges to access features or to personalize configurable ones can vary by user, as well as by role, and are determined by your organization. If you have questions about your privilege settings, contact your administrator.